nxtprograms.com

Fun Projects for your LEGO® MINDSTORMS® NXT!

Home     Projects     Help     Contacts

Modular Test Vehicle (MTV)
Building: Advanced
Program: Easy

Building Instructions


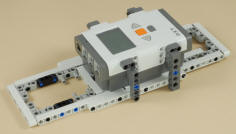
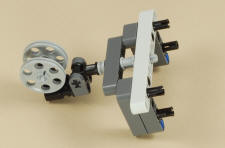
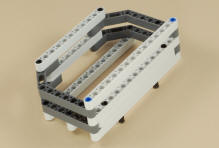
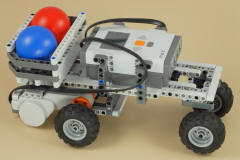
The Modular Test Vehicle consists of five different modules that can be built separately. 

Note: The Frame module has two versions of the instructions, depending on whether you are using AA batteries or the Li-Ion rechargeable battery pack.
 

1A. Frame for
AA Batteries
Intermediate 1B. Frame for
Rechargeable Battery
Intermediate 2. Drive Wheels Advanced
Building Instructions Building Instructions Building Instructions


3. Straight Wheels Easy 4. Castor Wheel Intermediate 5. Payload Basket Easy
Building Instructions Building Instructions Building Instructions

Assembling the Robot and Wiring the Drive Motors

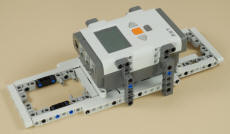
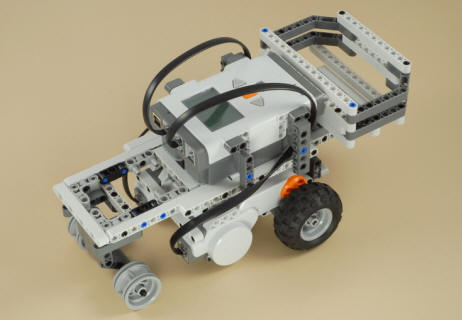
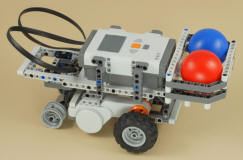
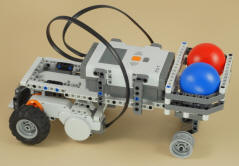
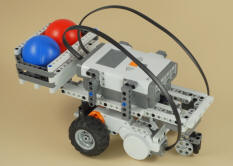
Once you have built the five MTV modules, you can snap them together any way you want to make a complete vehicle.  Note that no extra pegs are required to assemble the modules.  The modules have the pegs built-in, and the frame has a number of attachment points ready to go.  It is then also easy to pull the modules apart and reassemble them in a different way, so you can quickly experiment with several combinations to compare how well the resulting robots work.

Once you have snapped the modules together, you should use two wires to connect the two drive motors to ports B and C on the NXT.  If you want, you can try routing the wires around parts of the robot to keep them out of the way, as shown below.


Experimenting with Different Configurations

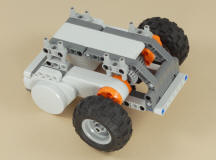
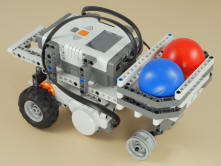
There are hundreds of different ways you can assemble the MTV modules into a complete robot, and each different configuration will perform differently.  Some will go straighter, others will turn better, some will carry heavier loads better, and some will be more consistent and accurate.  A few ideas to get you started are shown below.
 

Rear wheel drive, rear engine,
straight front wheels with tires,
medium wheelbase, rear payload.
 

Front wheel drive, mid engine,
rear castor wheel,
medium wheelbase, rear payload.
Front wheel drive, mid engine,
straight rear wheels without tires,
short wheelbase, front payload.
Rear wheel drive, mid engine,
straight front wheels without tires,
long wheelbase, front payload.
Rear wheel drive, mid engine,
straight front wheels without tires,
medium wheelbase, front payload.
Rear wheel drive, mid engine,
front castor wheel,
short wheelbase, rear payload.
 

Experimenting with Different Gears

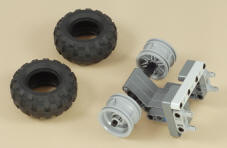
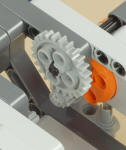
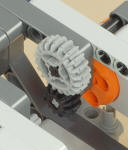
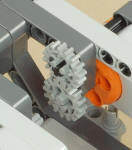
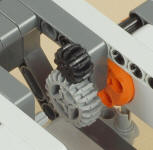
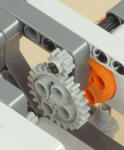
The Drive Wheels module is designed to make it easy to change the gears used so that you can experiment with different gear combinations.  Different combinations will result in different gear ratios, which will have a big effect on the speed and power of your robot.   The faster gear combinations will make the robot go faster but have less power, which will make it harder to turn and carry loads, and note that faster robots are also typically less accurate. 

Five different gear ratios are possible in the Drive Wheels module as shown below:


Motor Gear 8 tooth 12 tooth 16 tooth* 20 tooth 24 tooth
Wheel Gear 24 tooth 20 tooth 16 tooth* 12 tooth 8 tooth
Gear Ratio 24:8 = 3:1  (3.0) 20:12 = 5:3  (1.7) 16:16 = 1:1  (1.0) 12:20 = 3:5  (0.6) 8:24 = 1:3  (0.3)
Speed Very Slow Slow Medium Fast Very Fast

* Note that the Medium speed gear combination requires a total of four 16 tooth gears, but the Retail version of the NXT kit by itself has only two of these gears.

Changing Gears

You can change the gears used in the Drive Wheels drive module without taking the whole thing apart if you do it as follows.  This requires careful hands, but if you can do this then maybe you could be a mechanic for a race car team, as they are often required to crawl under the car to change out the gears to adjust the speed of the car!

  1. Remove the two gears on the inside of the wheel axles.

  2. Pull the wheels and the axles off on both sides. 

  3. Remove the two gears on the inside of the motor axles, and replace them with the new motor gears, rotating the new gears slightly as necessary to get the cross hole to line up with the motor axle.

  4. Replace the wheels and axles and put on the two new wheel gears on the inside.

  5. Check the axles and bushings on the wheels to make sure that everything is still secure and lined up, but not pushed together too tightly.  

Note: With the faster gear combinations, you will be able to turn a wheel by hand and see the gears turn, but on the slower gear combinations there will be too much resistance and the axle will just twist.

Important: When you change the gear ratio of your robot, you will also likely need to change the program to adjust the number of degrees or rotations specified for your Move blocks, because the robot will be moving more or less for a given amount of rotation of the motors.  See the programming section below.


MTV Programming

Two very simple programs are provided to get you started with testing your MTV robots.  You can also write your own test programs to do whatever you want.  When testing for mechanical performance, it is good to keep the program as simple as possible to avoid introducing more questions.

  • The Out_and_Back program makes the robot go forward then backward by the same amount.  If your robot tracks well in a straight line, then it should end up almost exactly where it started.  How far it goes out will depend a lot on which gears you use (see Experimenting with Different Gears), so be prepared to adjust the program for different gears, or to change the distance to your liking.  The longer the distance, the harder the test is.  You may also need to adjust the direction of the movement if your robot faces "backwards".  See the program comments for details.

  • The L_Turn program make the robot move in a simple L-shaped pattern, consisting of a straight section, a pivot turn to the right, then another straight section.  For the robot that I tested this program on, I adjusted the Duration of the pivot turn to make the robot do an approximate right angle turn, but your results will depend a lot on how your robot is designed, and especially which gears you use.   Be prepared to change the Duration of the Move blocks, especially the pivot turn. 

    Once you come up with a good starting point for the Durations, a good test for a robot is to see how consistently and accurately it can travel the same path.  Without making any changes to either the robot or the program, try carefully starting the robot in exactly the same spot and trying the L Turn three or more times in a row, marking the final position of the robot after each run.  Did the robot end up in the same place each time?  How close was it?

When you are making changes to the robot or the program, be sure to make only one change at a time before testing it again.  That way, you won't get confused about what caused a difference that you see.


Experimenting with Weight Balance

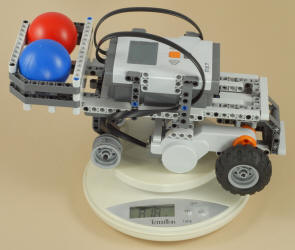
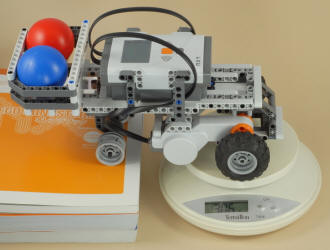
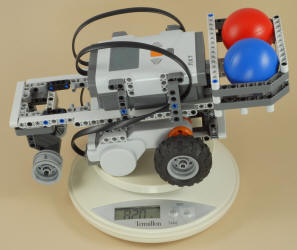
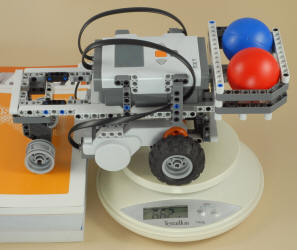
One design issue that you will definitely want to experiment with is that of weight balance, and the MTV is designed to make it easy to experiment with this.  The weight balance of a robot refers to what percentage of the robot's total weight is over the drive wheels, as opposed to the remaining percentage that is over any non-motorized rolling wheels or sliding parts.  Weight balance can have a huge impact on the performance of a robot, especially its ability to turn well and turn accurately and consistently.

Many teams that build robots for FIRST LEGO League, for example, have turning problems (such as stalling in a turn or inconsistent turn angles) that are ultimately caused by poor weight balance.  The resulting turning problems may only happen sometimes (due to variations in friction on the surface, different weights being carried, battery charge level, etc.), leading the teams to suspect problems with their programs or unknown gremlins in the NXT, when in fact the real problem often lies with the robot chassis design.

You can measure the actual weight balance of a robot by doing two measurements with a small scale as shown in the examples below, but you don't need a scale to do experiments with weight balance.  Without a scale, you can get a rough idea of the weight balance of your robot by putting the robot on a flat surface and then alternately lifting just the front or back of the robot with your hand to see which side feels heavier.  And even if you can't easily guess the approximate balance of the robot, the MTV frame is designed to make it easy to shift the modules back and forth to get more or less weight over the drive wheels, so just try making changes in one direction then the other and see which turns out better.
 

This example robot has a total weight of 818 grams when carrying the two balls, with 306 grams over the drive wheels.  To determine the drive wheel weight, put the drive wheels on the scale and then support the non-drive wheels on something off the scale that is tall enough to make the robot level.  Then to determine the percentage of weight over the drive wheels, divide the drive wheel weight by the total weight, so this robot has a weight balance of 306/818 = 37% over the drive wheels.
 
This second example robot has a total weight of 820 grams, with 662 grams or 662/820 = 81% over the drive wheels, which is much more than the first example above. 

The weight of a robot includes everything that it is carrying, so one thing that increases the drive wheel weight of the second robot is that the payload (basket and balls) is on the drive wheel side of the robot instead of the other side.  However, the biggest effect is due to the position of the NXT brick, which is the heaviest part of the robot.  Look at the position of the NXT brick in these two example robots and you will see how the second robot has the NXT positioned much farther on the drive wheel side of the robot.
 

Getting a Good Weight Balance

So, what is a good weight balance to shoot for?  Well, it depends on how your robot is built and what you need your robot to do, and there are some trade-offs, so you will need to experiment. 

Race cars (which turn by pivoting the front wheels) typically shoot for a weight balance of 50%, but for an NXT robot that turns by changing the speed and direction of two drive motors, you will typically want a weight balance of more than 50% over the drive wheels.  You may be able to go as high as say 80-90%, but this may make the robot unstable (it might pop a wheelie or tip over when changing speed or direction suddenly).  It also might affect the robot's ability to go straight accurately.


Challenges
  1. Try several different MTV robot designs and test them.  See how many different designs you can come up with.  Even if you think you know a design will be "bad" for some reason, try it anyway and see if you can predict what will happen when you test it.  For some of the designs that you think are good, experiment with some changes to see if you can make it even better.

  2. As discussed in the Experimenting with Weight Balance section above, the weight balance of your robot is also affected by any attachments and other weight that it is carrying.  Try putting the 3rd NXT motor in the payload basket to experiment with carrying a heavier weight.  Or how about something even heavier?  Can you make a design that can drive and turn well while carrying a full soda can?

  3. Adding even one turn to a programmed path can add a lot of inconsistency and error, especially to a robot design that is in need of improvements.  For an advanced challenge, try adding more turns.  For example, you could add steps to the end of the L_Turn program to make the robot retrace its steps in reverse and try to return to the starting point.

  4. The L_Turn program uses Move blocks for both its straight and turning parts.  But there is more than one way to power two motors.  You can also use two individual Motor blocks (one for each motor) on different sequences, or on the same sequence with the first one set to not "wait for completion" (so that they happen at the same time).  Try using these in place of either the straight or turn Move blocks.  For turning, try both stopping one motor and reversing one motor.  How do any of these change the performance and consistency of your robot?  Although the Move block has some built-in features to try to synchronize two motors, don't assume that it will work well for your robot.  For some robot designs it can make it worse.  Also, both the Move and Motor blocks have options such as Power level, Brake vs. Coast, Ramp Up, etc., that you can experiment with.

  5. Another difficult test for a robot is to see if it can perform consistently even with different levels of battery charge.  Try alternating between a set of worn and fresh AA batteries.  Or if you have the rechargeable battery pack, try alternating between that and AA batteries (fresh AA batteries will be more powerful than the rechargeable battery).

  6. Using the results of what you learn from your experiments, can you design your own robot chassis from scratch that performs as good or better than your best MTV design, but is simpler, uses fewer parts, is stronger, etc.?

  7. The MTV modules are specially designed to snap together without the need for additional pegs, and to pull apart without other parts of the robot coming apart.  Study how the attachments are done, and see if you can design other attachments that go on and off quickly and easily.

Get nxtprograms.com on CD!
Click here for info

Home     Projects     Help     Contacts


Copyright © 2007-2011 by Dave Parker.  All rights reserved. 
All project designs, images, and programs are protected by copyright.  Please see the usage policy.